NGINX Plus の設定
NGINX Plusをインストールしたホストに対し、NGINX Agentをインストールし動作を確認します。
UDF環境で動作する場合、 ubuntu03 (10.1.1.9) で操作することを想定しています
ドキュメントは以下のページの内容を参照しています
0. (事前準備) NGINX Plusのインストール
1. NGINX Plusのインストール・基礎
NGINX Plus Lab 3. 基本的な動作の確認 を参照してください
2. 必要なファイルの取得
NGINX Agent の動作や初期設定で参照するGitHubのレポジトリを取得します
sudo su -
git clone https://github.com/nginx/agent.git

git clone https://github.com/BeF5/f5j-nginx-agent-lab.git
3. Goのインストール
NGINX Agent及びMockアプリケーションはGoを利用します。
以下ページよりGoをインストールしてください。このラボでインストールする NGINX Agent v2.23.1 は Go 1.19以上 が必要となります
インストール手順はGoのマニュアルを参照しています
Note
こちらの手順は Go 1.23.1 のインストール手順となります
以下手順を参考にインストールします
sudo su -
# ファイルの取得
wget https://go.dev/dl/go1.23.1.linux-amd64.tar.gz

# ファイルの展開
rm -rf /usr/local/go && tar -C /usr/local -xzf go1.23.1.linux-amd64.tar.gz

# PATHの設定
export PATH=$PATH:/usr/local/go/bin
インストールしたバージョンを確認します
go version
1go version go1.23.1 linux/amd64
4. makeのインストール
一部手順で make を利用します。必要に応じてインストールしてください
sudo apt install make
インストールしたバージョンを確認します
make -v
1GNU Make 4.2.1
2Built for x86_64-pc-linux-gnu
3Copyright (C) 1988-2016 Free Software Foundation, Inc.
4License GPLv3+: GNU GPL version 3 or later <http://gnu.org/licenses/gpl.html>
5This is free software: you are free to change and redistribute it.
6There is NO WARRANTY, to the extent permitted by law.
5. jq のインストール
sudo apt install jq
1. NGINX Agent のインストール
NGINX Agentをインストールする環境のOS/CPUに応じたパッケージを取得します
1. OS/CPUの確認
cat /etc/os-release
 1NAME="Ubuntu"
 2VERSION="20.04.2 LTS (Focal Fossa)"
 3ID=ubuntu
 4ID_LIKE=debian
 5PRETTY_NAME="Ubuntu 20.04.2 LTS"
 6VERSION_ID="20.04"
 7HOME_URL="https://www.ubuntu.com/"
 8SUPPORT_URL="https://help.ubuntu.com/"
 9BUG_REPORT_URL="https://bugs.launchpad.net/ubuntu/"
10PRIVACY_POLICY_URL="https://www.ubuntu.com/legal/terms-and-policies/privacy-policy"
11VERSION_CODENAME=focal
12UBUNTU_CODENAME=focal
uname -m
1x86_64
この例では OS Version focal CPU amd64 に対応したNGINX Agent v2.23.1 をダウンロードします。
wget https://github.com/nginx/agent/releases/download/v2.23.1/nginx-agent-2.23.1.focal_amd64.deb
2. NGINX Agentのインストール
sudo dpkg -i nginx-agent-2.23.1.focal_amd64.deb
 1Selecting previously unselected package nginx-agent.
 2(Reading database ... 148909 files and directories currently installed.)
 3Preparing to unpack nginx-agent-2.23.1.focal_amd64.deb ...
 4
 5 --- NGINX Agent Package Installer ---
 6
 7 --- Will install the NGINX Agent in 5 seconds ---
 8Sudo permissions detected
 9Could not find /etc/nginx-agent/agent-dynamic.conf ... Creating file
10Successfully created /etc/nginx-agent/agent-dynamic.conf
11Updating /etc/nginx-agent/agent-dynamic.conf ...
12Agent config file /etc/nginx-agent/nginx-agent.conf does not exist. Could not be updated
13Unpacking nginx-agent (2.23.1~focal) ...
14Setting up nginx-agent (2.23.1~focal) ...
15PostInstall: Reading NGINX systemctl unit file for user information
16NGINX processes running as user 'root'. nginx-agent will be configured to run as same user
17PostInstall: Reading NGINX process information to determine NGINX user
18NGINX processes running as user 'nginx'. nginx-agent will try add that user to 'nginx-agent'
19Sudo permissions detected
20Found nginx-agent /usr/bin/nginx-agent
21PostInstall: Adding nginx-agent group nginx-agent
22PostInstall: Adding NGINX / agent user root to group nginx-agent
23PostInstall: Adding NGINX Worker user nginx to group nginx-agent
24PostInstall: Creating NGINX Agent run directory
25PostInstall: Modifying group ownership of NGINX Agent run directory
26PostInstall: Modifying NGINX Agent unit file with correct locations and user information
27PostInstall: Reload the service unit from disk
28PostInstall: Unmask the service unit from disk
29PostInstall: Set the preset flag for the service unit
30Created symlink /etc/systemd/system/multi-user.target.wants/nginx-agent.service → /etc/systemd/system/nginx-agent.service.
31PostInstall: Set the enabled flag for the service unit
32----------------------------------------------------------------------
33 NGINX Agent package has been successfully installed.
34
35 Please follow the next steps to start the software:
36    sudo systemctl start nginx-agent
37
38 Configuration settings can be adjusted here:
39    /etc/nginx-agent/nginx-agent.conf
40
41----------------------------------------------------------------------
正しくインストールしたことを確認します
dpkg -l | grep nginx-agent
1ii nginx-agent 2.23.1~focal amd64 NGINX Agent
3. NGINX Agent の起動・自動起動を有効にする
NGINX Agentを起動、自動起動を有効にします
sudo systemctl start nginx-agent
sudo systemctl enable nginx-agent
正しく起動したことを確認します
ps -ef | grep nginx-agent
1root 2027 1 99 14:25 ? 00:00:08 /usr/bin/nginx-agent
sudo systemctl status nginx-agent
 1● nginx-agent.service - NGINX Agent
 2     Loaded: loaded (/etc/systemd/system/nginx-agent.service; enabled; vendor preset: enabled)
 3     Active: active (running) since Fri 2023-03-03 15:32:49 JST; 5s ago
 4       Docs: https://github.com/nginx/agent#readme
 5    Process: 5375 ExecStartPre=/bin/mkdir -p /var/run/nginx-agent (code=exited, status=0/SUCCESS)
 6    Process: 5376 ExecStartPre=/bin/mkdir -p /var/log/nginx-agent (code=exited, status=0/SUCCESS)
 7   Main PID: 5377 (nginx-agent)
 8      Tasks: 5 (limit: 2327)
 9     Memory: 4.0M
10     CGroup: /system.slice/nginx-agent.service
11             └─5377 /usr/bin/nginx-agent
12
13Mar 03 15:32:49 ip-10-1-1-7 systemd[1]: Starting NGINX Agent...
14Mar 03 15:32:49 ip-10-1-1-7 systemd[1]: Started NGINX Agent.
15Mar 03 15:32:49 ip-10-1-1-7 nginx-agent[5377]: time="2023-03-03T15:32:49+09:00" level=warning msg="Log level is info"
16Mar 03 15:32:49 ip-10-1-1-7 nginx-agent[5377]: time="2023-03-03T15:32:49+09:00" level=info msg="setting displayName to ip-10-1-1-7"
17Mar 03 15:32:49 ip-10-1-1-7 nginx-agent[5377]: time="2023-03-03T15:32:49+09:00" level=info msg="NGINX Agent v2.23.1 at 8fa9a62e wi>
18Mar 03 15:32:49 ip-10-1-1-7 nginx-agent[5377]: time="2023-03-03T15:32:49+09:00" level=error msg="Unable to create command channel:>
19Mar 03 15:32:49 ip-10-1-1-7 nginx-agent[5377]: time="2023-03-03T15:32:49+09:00" level=info msg="Commander retrying to connect to 1>
NGINX Agentのログは以下に出力されます
ls /var/log/nginx-agent/
1agent.log
2. NGINX Agent 設定ファイルの確認
NGINX Agent の設定ファイルに必要な内容を追加します。
# フォルダが存在しない場合
# sudo mkdir /etc/nginx-agent
sudo cp /etc/nginx-agent/nginx-agent.conf /etc/nginx-agent/nginx-agent.conf-
sudo touch /etc/nginx-agent/agent-dynamic.conf

sudo cp ~/f5j-nginx-agent-lab/config/nginx-agent.conf /etc/nginx-agent/
外部からの接続を受けるため、以下のような設定となります
tail -13 /etc/nginx-agent/nginx-agent.conf
 1api:
 2  # default port for Agent API, this is for the server configuration of the REST API
 3  port: 8081
 4
 5server:
 6  # host of the control plane
 7  host: 127.0.0.1
 8  grpcPort: 54789
 9# tls options - NOT RECOMMENDED FOR PRODUCTION
10tls:
11  enable: false
12  skip_verify: true
これらの設定が完了することでNGINX Agentはステータスを以下ポートでの処理が可能な状態となります
gRPC Port |
54789 |
REST Port |
8081 |
設定を反映します
sudo systemctl restart nginx-agent
3. Swagger のインストール
1. インストール
NGINX Agent及びMockアプリケーションはGoを利用します。
以下ページよりGoをインストールしてください。このラボでインストールする NGINX Agent v2.23.1 は Go 1.19以上 が必要となります
インストール手順はGoのマニュアルを参照しています
Note
こちらの手順は Go 1.23.1 のインストール手順となります
以下手順を参考にインストールします
download_url=$(curl -s https://api.github.com/repos/go-swagger/go-swagger/releases/latest | \
  jq -r '.assets[] | select(.name | contains("'"$(uname | tr '[:upper:]' '[:lower:]')"'_amd64")) | .browser_download_url')
sudo curl -o /usr/local/bin/swagger -L'#' "$download_url"
sudo chmod +x /usr/local/bin/swagger
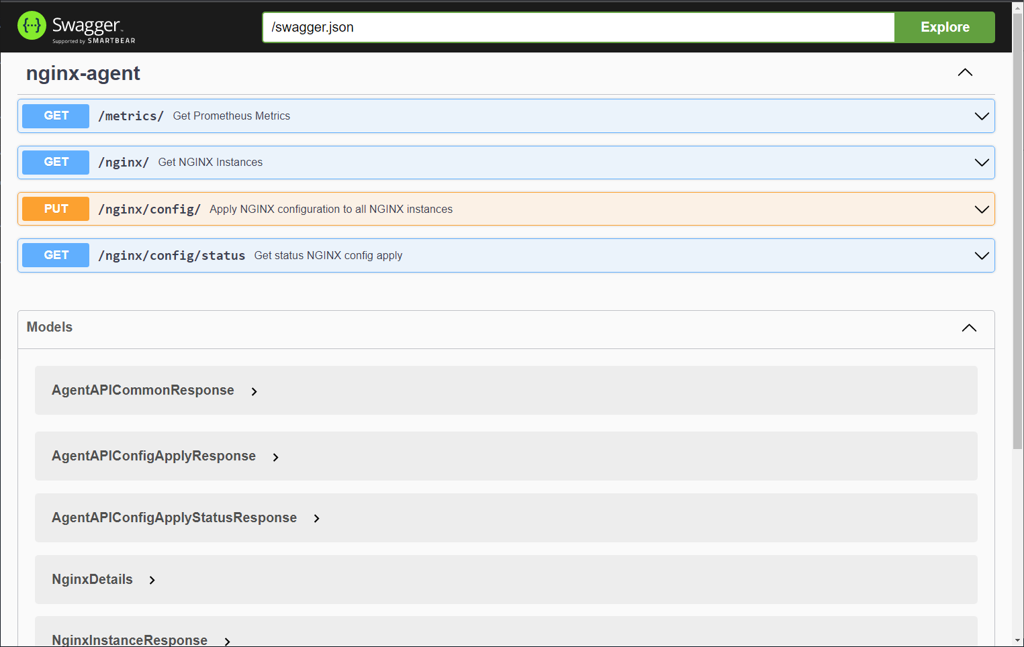
Swagger UIの実行
cd ~/agent/
make launch-swagger-ui
# 2回目以降は make launch-swagger-ui & によりバックグラウンドでSwaggerUIを実行できます
1** 省略 **
2go run github.com/go-swagger/go-swagger/cmd/swagger serve ./docs/swagger.json -F=swagger --port=8082 --no-open
32023/03/03 17:09:42 serving docs at http://localhost:8082/docs
踏み台ホストでChromeを起動し、 http://10.1.1.9:8082/docs に接続してください
2. curl を使った Statusの確認
NGINX Agent が 8081 で待ち受けるREST APIに対してステータスの確認が出来ます。
参考情報は Tips1. curl によるNGINX Agent RESTの結果 を参照してください。
4. Grafana / Prometheus のインストール
NGINX Agent が提供する Metrics 情報を表示するためGrafanaを実行します
cd ~/f5j-nginx-agent-lab/docker-compose
docker-compose -f docker-compose.yml up -d
正しくコンテナが起動すると、以下ポートでサービスが起動します
Grafana |
3000 |
Prometheus |
9090 |
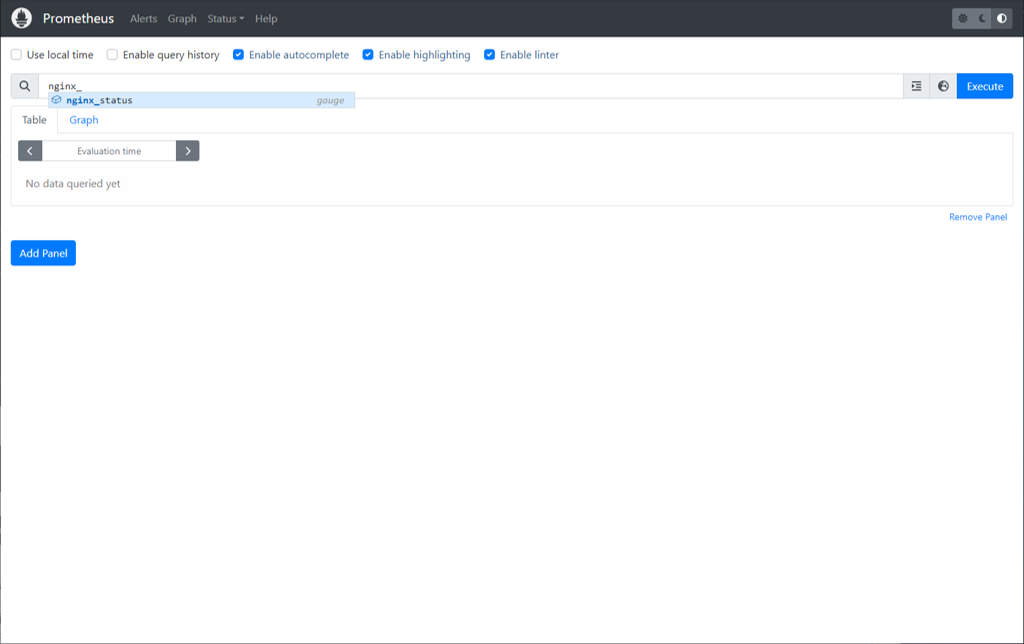
踏み台ホストでChromeを起動し、 Prometheus http://10.1.1.9:9090 に接続してください。正しく起動している場合、以下のような画面が表示されます
踏み台ホストでChromeを起動し、 Grafana http://10.1.1.9:3000 に接続してください。正しく起動している場合、以下のような画面が表示されます
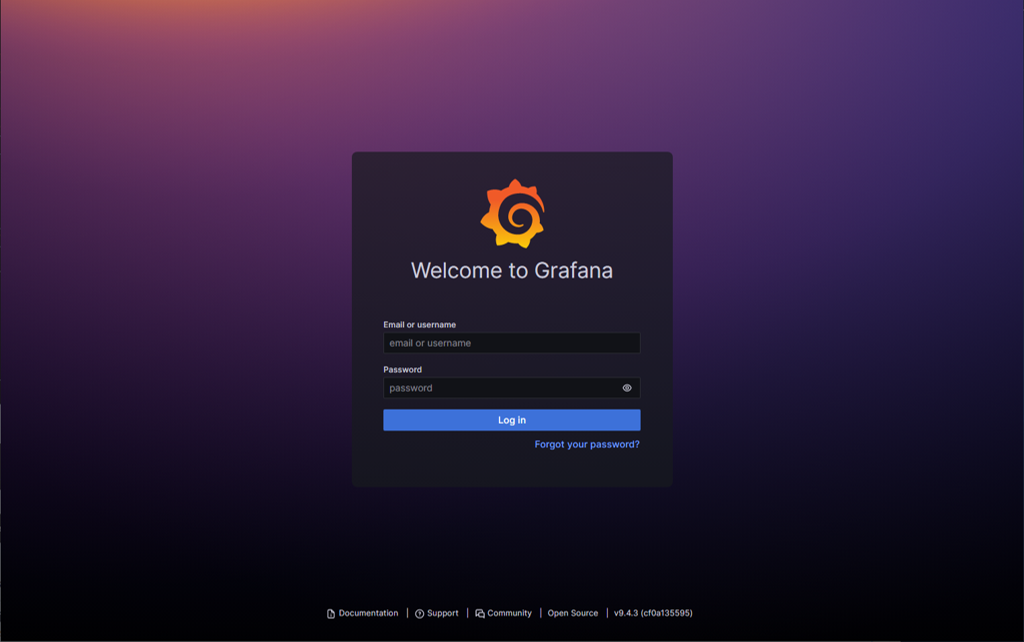
user:admin , password:admin でログインします。初回時にパスワードを変更するよう促されますので適宜パスワードを指定してください
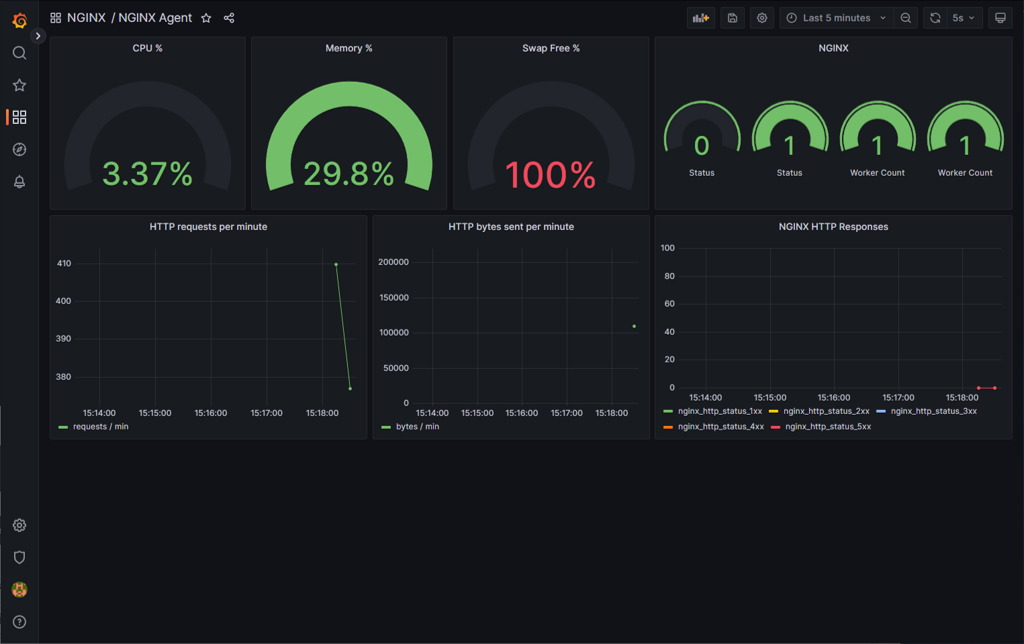
Top画面の下部に表示された NGINX Agent のダッシュボードをクリックするとステータスが取得できます。
(すべての項目が表示されるまで5分ほど必要となります)
5. モックアプリケーションの起動
1. インストール
こちらのモックアプリケーションはGoを利用します。 Goのインストール の手順を参考にGoのインストールを行ってください
モックアプリケーションを実行します
cd ~/agent/
go run sdk/examples/server.go
# 初回は必要なファイルのダウンロードなどプログラムの実行に約1分かかります
# 2回目以降は go run sdk/examples/server.go & によりバックグラウンドでモックアップアプリケーションを実行できます
1** 省略 **
2INFO[0000] http listening
3INFO[0000] gRPC listening
踏み台ホストでChromeを起動し、 http://10.1.1.9:54790 に接続してください
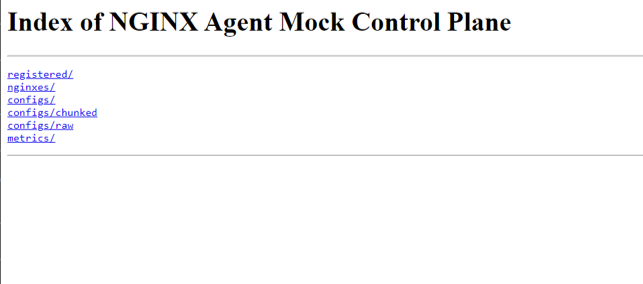
提供されている情報は以下となります
registered - マネージメントプレーンとして動作するモックアップに登録されているデータプレーンの情報を表示
nginxes - データプレーンのNGINXインスタンス情報のリスト表示
configs - マネージメントプレーンに送付されたProtobufペイロードのNGINX設定を表示
configs/chunked - マネージメントプレーンに送付された分割されたペイロードを表示
configs/raw - データプレーンに設定されている実際のNGINX設定を表示
metrics - マネージメントプレーンに送付されたメトリクスの情報を表示(REST APIで送付されるものと同じ)
2. curl を使った Statusの確認
モックアップアプリケーションがNGINX Agentの 54790 にgRPCで接続し、取得した情報の確認が出来ます。
参考情報は Tips2. curlによるモックアプリケーションの結果 を参照してください。